-
Bessa Rangefinder Calibration
No matter what rangefinder you use, there’s a good chance that you’ll need to have the rangefinder calibrated one time or another. This is no big deal if you’re aware that the problem can happen (often as a result of bumping or dropping the camera)
Some cameras will need adjustment more than others, and the Voigtlander Bessa range seem to be more prone to rangefinder misalignment than others (this can be said for the Epson RD as well, which is basically a digital Bessa).
Many older cameras have a pretty simple adjustment process, and there’s quite a lot of info on the net documenting the process. However much of the Bessa range is still relatively new, and at first it seems as though the whole adjustment process is a guarded secret. Naturally, many Bessa owners weren’t too keen on paying a full service fee for a 10 minute RF alignment, so they begun to search for ways to do it themselves.There’s quite a lot of info floating around the internet on this subject, but I noticed much of it either lacked pictures or description of “simple” steps. I’ve attempted to combine all of my research together in one place and provide some instructions based off my own personal experience. This process was completed on a Bessa R3A, however I’m told most of the Bessa range is very similar.
*Disclaimer. It’s recommended you ignore these instructions and get your Bessa calibrated by a registered Voigtlander technician if :
- You don’t have experience pulling apart and fixing cameras,
- You’re not confident with small tools,
- You’re clumsy,
- You don’t take responsibility for your own actions and will want to blame your broken camera on me.
1. First of all, to calibrate the rangefinder you won’t necessarily need to take the entire top plate off. It is possible to remove part of the hot shoe that will give you access to the adjustment screws. This can be a tricky process particularly if you don’t want to scratch the black paint on your hot shoe. You’ll need a small flat head screwdriver or even a toothpick to wedge and pop/lift up the cover plate illustrated in the photo below.

When you lift the edge up enough, the cover will pop up and you can slide it out in the direction of the arrow above. It’s important to have patience with this step, as it’s easy to get frustrated and be a little too forceful. You don’t want to break or scratch anything.
2. When you get the cover off, you’ll see the bracket is held on with 4 screws shown in the image below.

Taking these screws off should be pretty simple, they weren’t on too tight with my camera. You’ll need a size #00 Philips head screwdriver for this.
3. Now that you have the bracket off you’ll be able to access the adjustment screws. I could only get a photo of one with the sub standard light I was working in, but I’ve show where the others are using blue circles. The screws are numbered from 1 to 3 for reference purposes.

You’ll need a long flat head screwdriver to adjust these screws. Also, you may need to remove any “loctite” or similar residue around the screws that prevent you from turning them.
The adjustment process
Below is a description of what each screw does. Quite often you’ll only need to adjust one of these so don’t feel overwhelmed.
Screw 1: Rangefinder patch focus adjustment
Screw 2: Horizontal (left/right) adjustment for Infinity focus
Screw 3: Vertical (up/down) adjustment
*There is a 4th screw also, but to access it you need to remove the entire top plate. It calibrates the base length but you’ll hopefully not need to adjust it.Now we can start calibration. Once your camera is adjusted at infinity focus, everything should line up for close focus as well, but check just in case. My camera needed horizontal adjustment, yours might need vertical (or both). Find a place to set your camera up on a tripod where you have clear vision to something you can focus on for infinity (make sure it’s at least 5 blocks away, its better to be safe than sorry). Adjusting horizontal alignment wont affect vertical alignment, so don’t worry.
RF Patch Focus: If your rangefinder patch isn’t sharp then you’ll need to calibrate it also. Doing this first will make the other steps easier. Also, I’ve heard that adjusting this screw can sometimes move the horizontal alignment as well. I didn’t experience this but you may want to keep it in mind. Turn screw #1 to calibrate this. You may also want to do this with the Vertical alignment leaving the infinity and close focus adjustments to last. It’s not absolutely necessary though.
Horizontal: Set lens focus to infinity (use a lens you know is accurate), and then point the RF patch at an object in the distance. Adjust screw #2 which will move the patch left to right and stop when its properly aligned. Be very delicate and precise as it’s quite sensitive.
Vertical: With the lens still focused at infinity, adjust screw #3 which moves the patch up and down. It’s a larger screw and isn’t as deep as the others so it might be easier to access. Once again be very precise.
Close Focus: I’ve never done this adjustment before, so cant speak from experience. Every time I’ve adjusted at infinity the close focus has been fine. To calibrate close focus you’ll need to remove the top plate and access another screw which isn’t covered in this guide. However I’ve been told that very small adjustments can be made using screw #1. You should be adjusting your lens at 1m for close focus calibration.After you’ve adjusted all the screws for calibration you can put something on them like “loctite” that will help prevent misalignment in the future. To reassemble everything you just reverse the dis-assembly process. I’ve only had to do this once, and to be honest id you’ve had to re-calibrate several times you may want to consider why this is happening.
Update: Thanks for all the positive feedback, I’m happy this guide has been helpful to so many people. Just remember to be slow and systematic and the whole process should be complete without any issues at all.
Have fun 🙂 -
Canon P
I got this little beast a while ago now, but have only got a chance to make a post about it today.
The Canon P (“Populaire”) was made between 1958 and 1961. It’s one of Canon’s last screw mount rangefinders and regarded by many as one of the best looking rangefinders ever produced. All i know is that it works and feels great to use.
They’re were originally made as a base/basic model, but in reality were one of the last truly “bulletproof” cameras produced by Canon, so many are still working as well today as they were over 50 years ago.
There’s not too much to the camera. No light meter, so there’s no electrical issues. No fancy features that cause problems. Just a simple, clean looking camera, that works as good as it looks with a smooth film advance, and a satisfying shutter sound. The viewfinder is quite big and very bright with nice clear frame lines (maybe mine has been CLA’s recently?).
Why use a camera with no light meter and no features that make life easier? Well, its fun.
Below is a photo of mine with a Jupiter 8 attached I had lying around. The 50mm frame lines are particularly well placed in the VF, so I think a 50mm lens will live on the Canon now.
I got this camera for a steal of a price, but they regularly sell for around $100-$150, and at that price i still think they’re great value. If you want a super reliable camera, stripped back on fancy features that will take some of the greatest lenses ever created (Leica Thread Mount), then i cant think of any camera more suitable than the Canon “Populaire”.
-
Canonet 19
Ok, I’ve been cutting back on my camera collecting, but this little gem was going very cheap so I had to buy it. I mean, for less than $20 you cant really go wrong.
Its a Canonet 19 from the mid to early 60’s. Sort of a beefed version of an Olympus trip bit with a faster 45mm f/1.9 lens and manual control. Oh and a funky bottom film advance lever too. I wasn’t too confident on the condition as it was really cheap (they’re not worth a great amount anyway), but I was pleasantly surprised when I received it today. Aperture and shutter are all working, and even auto mode seems to be going good which means the light meter is ok. Cosmetically its in top condition too. It also came with its original eveready case and yellow filter which look great. But what is even cooler is its original box. I think it looks great with the fancy “Canonet” typeface, and canon logo with colour design etc.
I have a little time off soon, so will put a roll through it and see the results. It looks as though someone changed the light seals not too long ago, so I’m quietly confident that it’ll work.
Here’s a shot of it below. I didn’t take it in my light box as I couldn’t be bothered setting it up. I just put it in front of a window on white cardboard and put some white paper behind it. You obviously cant get the same lighting control you would with a proper light box, but this is a decent quick/temporary solution.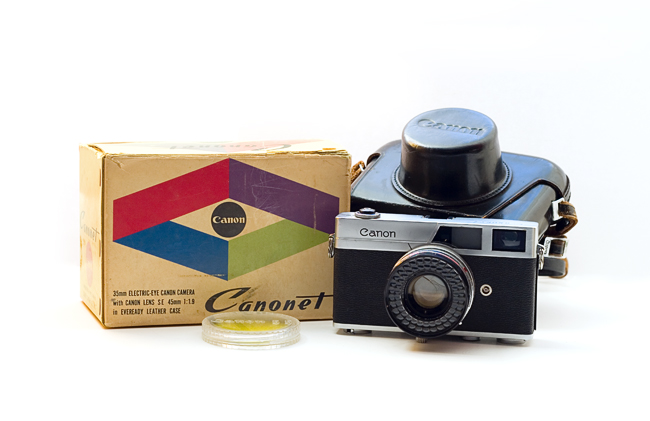
-
Olympus 35-SP
There are quite a lot of options available if you’re looking for a 70’s rangefinder. Some good, some bad, some just mediocre. This variety however produces opportunity to find something interesting or “quirky” that may suit your style or at the very least be a lasting memory of someone’s (or some committee’s) inspired design. There is one model however that stands out amongst many. The brilliant Olympus 35-SP.
Built between 1969 and 1976, this compact rangefinder packs in an unrivalled set of features that puts to shame many of even the most modern rangefinders. Its tack sharp 42mm f/1.7 G.Zuiko lens renders pictures with brilliant colour and contrast. The large bright viewfinder contains parallax error indicators and an accurate rangefinder patch. Then there’s the sophisticated metering system.
The Olympus 35-SP has the distinction of being the first ever 35mm rangefinder with dual metering options. Both centre weighted and spot metering is available to the user, which is quite amazing when you consider its age and compact size of the camera. After the SP was produced, Leica included spot metering on the Leica M5 and CL but they were already beaten to the punch, and quite frankly were inferior to the accuracy of the 6 degree spot that came with the SP. Unlike many other rangefinders from that era the light metering works in full manual mode also, which is quite useful when shooting in tricky lighting conditions or if you’re after a specific effect only manual control can produce.Besides a revolutionary metering system, the Olympus SP came with a brilliant lens mentioned earlier. This 7 element 42mm f/1.7 G.Zuiko is regarded as one of the finest rangefinder fixed lenses ever produced. The Olympus RD (which came after the SP) has a similar lens, and although a great camera in its own right it lacked the 7th correcting element. Don’t let anybody try and tell you that they’re the same lens, because they’re in a different league. The SP lens focuses down to about 2.8ft and has a super smooth focusing action with a convenient lever on the side of the barrel. All automatic and manual exposure options are contained on the barrel rings as is the timer. After a while you can adjust these without taking your eye from the viewfinder, but admittedly it will take a little practice.
So with the SP you get a bright accurate viewfinder, unrivalled metering options, one of the best rangefinder lenses ever produced, all squeezed into a tough and compact body that manages to weigh less that comparable rangefinders of that era… What more do you want??
Oh yes, it comes in a (scarce) black finish too, and I was lucky enough to find one 🙂 (picture taken with my homemade light box)
*EDIT: I just got a Silver one also, check out a picture of them together here