
Tech/Repairs
-
Olympus OM-4 + Bessa Grip
Some months ago I decided to get back into black and white shooting after spending about a year shooting colour on a p&s. It’s always refreshing to have bit of a change, and whilst I don’t make a conscious effort to exclusively shoot on one medium or another, I’ve found that I’ll naturally stick with one or two cameras or types of film unless I make a conscious effort to mix things up a little. Whichever way I “mix things up”, I inevitably find myself returning to the OM series, or one of my rangefinders. I’ve tried other SLR systems over the last few years but they don’t feel as natural as the OM system to me (if you couldn’t already tell by the number of OM’s I have and use).
Anyway, I got this OM-4 for free after the previous owner told me it had electrical problems. It sat on my shelf until earlier in the year when I decided to find out once and for all if it was working. First step was to try and give it bit of a clean – the camera had come from someone who originally lived in the Northern Territory, so it was covered in that distinctive N.T red dirt/dust. I couldn’t see any obvious problems so after sourcing a battery cover from a generous member at RFF, I put a test roll through it and to my surprise everything worked perfectly.
After a few days I was looking at my Bessa R3A and noticed how similar in size it is to the OM SLR’s. From this I eventually discovered that the Bessa grips fits on the OM4 (and others) with ease. The grip is actually a little bit big for the OM-4 (as the Bessa is larger), but it does the job pretty well. The ergonomics of the camera have improved somewhat and it doesn’t stand out visually too much or add any noticeable weight. It’s a bit ghetto I know, but I’m thinking it’ll give me more street cred now haha… Anyway, it was an experiment that worked well. I figured I’d try it after hearing people ask if it’s possible. Yes it is, albeit not perfect, however it does the job!
-
Bessa Rangefinder Calibration
No matter what rangefinder you use, there’s a good chance that you’ll need to have the rangefinder calibrated one time or another. This is no big deal if you’re aware that the problem can happen (often as a result of bumping or dropping the camera)
Some cameras will need adjustment more than others, and the Voigtlander Bessa range seem to be more prone to rangefinder misalignment than others (this can be said for the Epson RD as well, which is basically a digital Bessa).
Many older cameras have a pretty simple adjustment process, and there’s quite a lot of info on the net documenting the process. However much of the Bessa range is still relatively new, and at first it seems as though the whole adjustment process is a guarded secret. Naturally, many Bessa owners weren’t too keen on paying a full service fee for a 10 minute RF alignment, so they begun to search for ways to do it themselves.There’s quite a lot of info floating around the internet on this subject, but I noticed much of it either lacked pictures or description of “simple” steps. I’ve attempted to combine all of my research together in one place and provide some instructions based off my own personal experience. This process was completed on a Bessa R3A, however I’m told most of the Bessa range is very similar.
*Disclaimer. It’s recommended you ignore these instructions and get your Bessa calibrated by a registered Voigtlander technician if :
- You don’t have experience pulling apart and fixing cameras,
- You’re not confident with small tools,
- You’re clumsy,
- You don’t take responsibility for your own actions and will want to blame your broken camera on me.
1. First of all, to calibrate the rangefinder you won’t necessarily need to take the entire top plate off. It is possible to remove part of the hot shoe that will give you access to the adjustment screws. This can be a tricky process particularly if you don’t want to scratch the black paint on your hot shoe. You’ll need a small flat head screwdriver or even a toothpick to wedge and pop/lift up the cover plate illustrated in the photo below.

When you lift the edge up enough, the cover will pop up and you can slide it out in the direction of the arrow above. It’s important to have patience with this step, as it’s easy to get frustrated and be a little too forceful. You don’t want to break or scratch anything.
2. When you get the cover off, you’ll see the bracket is held on with 4 screws shown in the image below.

Taking these screws off should be pretty simple, they weren’t on too tight with my camera. You’ll need a size #00 Philips head screwdriver for this.
3. Now that you have the bracket off you’ll be able to access the adjustment screws. I could only get a photo of one with the sub standard light I was working in, but I’ve show where the others are using blue circles. The screws are numbered from 1 to 3 for reference purposes.

You’ll need a long flat head screwdriver to adjust these screws. Also, you may need to remove any “loctite” or similar residue around the screws that prevent you from turning them.
The adjustment process
Below is a description of what each screw does. Quite often you’ll only need to adjust one of these so don’t feel overwhelmed.
Screw 1: Rangefinder patch focus adjustment
Screw 2: Horizontal (left/right) adjustment for Infinity focus
Screw 3: Vertical (up/down) adjustment
*There is a 4th screw also, but to access it you need to remove the entire top plate. It calibrates the base length but you’ll hopefully not need to adjust it.Now we can start calibration. Once your camera is adjusted at infinity focus, everything should line up for close focus as well, but check just in case. My camera needed horizontal adjustment, yours might need vertical (or both). Find a place to set your camera up on a tripod where you have clear vision to something you can focus on for infinity (make sure it’s at least 5 blocks away, its better to be safe than sorry). Adjusting horizontal alignment wont affect vertical alignment, so don’t worry.
RF Patch Focus: If your rangefinder patch isn’t sharp then you’ll need to calibrate it also. Doing this first will make the other steps easier. Also, I’ve heard that adjusting this screw can sometimes move the horizontal alignment as well. I didn’t experience this but you may want to keep it in mind. Turn screw #1 to calibrate this. You may also want to do this with the Vertical alignment leaving the infinity and close focus adjustments to last. It’s not absolutely necessary though.
Horizontal: Set lens focus to infinity (use a lens you know is accurate), and then point the RF patch at an object in the distance. Adjust screw #2 which will move the patch left to right and stop when its properly aligned. Be very delicate and precise as it’s quite sensitive.
Vertical: With the lens still focused at infinity, adjust screw #3 which moves the patch up and down. It’s a larger screw and isn’t as deep as the others so it might be easier to access. Once again be very precise.
Close Focus: I’ve never done this adjustment before, so cant speak from experience. Every time I’ve adjusted at infinity the close focus has been fine. To calibrate close focus you’ll need to remove the top plate and access another screw which isn’t covered in this guide. However I’ve been told that very small adjustments can be made using screw #1. You should be adjusting your lens at 1m for close focus calibration.After you’ve adjusted all the screws for calibration you can put something on them like “loctite” that will help prevent misalignment in the future. To reassemble everything you just reverse the dis-assembly process. I’ve only had to do this once, and to be honest id you’ve had to re-calibrate several times you may want to consider why this is happening.
Update: Thanks for all the positive feedback, I’m happy this guide has been helpful to so many people. Just remember to be slow and systematic and the whole process should be complete without any issues at all.
Have fun 🙂 -
Noise Reduction Shootout
Well after seeing Tim’s test on noise reduction software, I thought I’d try one out myself. I’d never really compared different NR (noise reduction) processes before, instead I’d just basically given up high iso photography. I have to say, after mucking around with the software a little bit, I’m not so worried about using high iso settings on the DSLR anymore. I was quite impressed.
I only had 3 methods of NR which included DPP (Digital Photo Professional), Noise ninja, and “Camera RAW” with photoshop. I tried all on the same photo which I’ve taken a 100% crop sample of. I tried to include a mix of textures in the sample.
View the image below at it’s largest size and you immediately you notice each process produced quite different results.
The original photo was taken indoors with dim light. The digital noise isn’t that bad really, i have other photos that are worse, but I chose this as it had several different textures and is common of the iso noise I get.
Camera RAW seemed to keep the most “faithful” colours, but blurred pretty much everything. Some detail was lost particularly in the edges, which gave an overall soft look to the photo. It seemed to get rid of both noise and grain which are two different things really. By getting rid of some grain it lost a bit of sharpness and detail.
DPP was a little less full on when it came to removing the grain. It still has quite a bit which helps keep some overall sharpness. To my eyes it has a nicer contrast and colour too. I’d never used DPP before, but it looks to be quite effective.
Noise Ninja was again different. I downloaded the 400D (Rebel XTi) NR profile from the manufacturer website and gave it a go. It appears to be bit of a mixed bag. I like how it’s kept some edge sharpness, more than the other programs, but it makes the skin look like plastic. Some people might like that as bit of an airbrushed skin shortcut, but its not to my tastes. The colour has again changed from the original, probably the most drastic out of all. It was also introduced some of its own fragments to the image which look a little messy, this might be treatable in the setting panel which I didn’t play around with (I just used standard setting for all).
After looking at the 3 noise reduction programs, I have to say i quite like them all in one way or another.
I’d never used DPP before, but I liked how it treated the image. It still has some grain, but removes most of the digital noise which is what I want most. It had nice contrast i thought, and the colours looked fine too. The only downside is that there’s not many options for individual settings. So fine tuning is pretty much out of the question. (It almost seems as though it was bit of an after thought with the DPP software, but that’s another story).
Noise ninja seems very powerful with a large range of fine tuning options. I think once i play around with it I’ll be able to reduce the plastic skin look. The colours looked quite different from the original too, but that’s probably another thing that can be fixed also. The program seems to need a bit of fine tuning which is to be expected I guess. But the whole idea is to minimise hours in front of the computer, if I have to play around with NN each time I use it, I’ll probably lose interest. That’s just a personal thing though.
Then there’s Camera RAW which seems fine, but would probably be my last choice. It just seems to give bit of an overall blur to the image, which isn’t all that useful.I guess it all comes down to personal preference. If i can get Noise Ninja sorted out, I’ll use that the most. Otherwise I’ll go with DPP and its simplicity.
-
Red Filter test
I found an old red filter in one of my camera bags today and thought I’d try it out with the remaining film in the camera. For a while now I’ve been wondering what differences it can make to black and white photography, I’ve read about what it does and why it was popular before the days of photoshop, but I figured I’d just make my own test and shoot two identical shots to see the difference with and without the filter (I was looking for ways to finish the roll off, haha)
I have to say I was quite surprised by the boost in contrast it gives. I never imagined it’d be that much.
The example shots below probably didn’t have the best subject matter or setting to see the full advantage of a red filter but I took some photos afterwards that really benefited from it (will post them later). I tried to stitch them together in the pic below. It looks more drastic when I export this jpeg from photoshop than the individual scans suggest. There should be a little more detail in the bottom right shadow even though that area is very dark in the red filter example below.
I don’t think this will be the last tie I use this filter.
-
b&w film developing
I’ve started developing my own black and white film recently, so thought I’d post up some info on the process for others who may also be starting out. When I first begun researching the process I noted the vast array of conflicting opinions for the more minute details, however managed to distil the fundamental process of developing fairly easily. Quite simple, it consists of three steps. They are :
- Developer
- Stop Bath
- Fixer
Now it’s possible to break down each step further as there are almost endless options. Basically it comes down to timing and choice of chemical. I decided to keep things simple though so this is how I approached those steps.
- For my developer I chose Rodinal. It is the oldest commercial developer on the market, so my logic was that there should be plenty of info about dilution and timing online already.
- Next you have the stop bath. This can consist simply of water if you choose, however I decided to go with an Ilford stop solution as it uses less water and is a little quicker (Ilford Ilfostop).
- Lastly there’s the fixer with another range of chemical options, however I kept things simple and went with an Ilford product again (Ilford rapid fixer).
After completing these 3 fundamental processes you have a couple of extra options :
- A Hypo-Clearing Agent which cuts down washing time considerably (instead of using 30 minutes you use 7 for example).
- Then a product like Photoflo which is the very last step before drying. It will coat the film and help prevent uneven drying and water marks etc.
Although these two steps are optional, they are worthy of serious consideration. After you’ve completed the whole process all you need to do is hang the film to dry. If you don’t have a dedicated dryer it’s recommended by many to let the film dry overnight. I normally wait at least a few hours depending on the weather though as I’m often a little impatient. You just don’t want to put wet film away in to storage though as it won’t end well.
Now, what about timings and dilutions for the development stage? Behold the amazing resource that is digitaltruth’s Massive Dev Chart :
http://www.digitaltruth.com/devchart.html
It should contain the film you’re choosing to develop and the developer you’re using. Just match it up with the iso you shot at and choose your dilution, you’ll then have a suggested development time. Bear in mind though with b&w film there is no standard method, it involves trial and error as factors such as water type and temperature, dev tank and reel design, rotation method and chemical age can all influence the end result. My tip would be using the same equipment and keeping your own journal of dev times and results to refer back to.In the interest of keeping things simple I’ve left out a number of elements that are better demonstrated than written. Simply search youtube for a guide on film developing as visualising the process will increase your chances of success. Here are a couple links to help get you started :
http://www.youtube.com/watch?v=Vu0Ul_wsYO8 (One of many film developing videos on youtube)
http://outsideinpixels.com/blog/?p=1152Â (My friend Jack’s more detailed film developing guide)
http://www.photogs.com/bwworld/bwfilmdev.html (Another b&w film developing guide I used to get started)Below is a picture of the equipment I’m using at the moment. Nothing advanced of complicated, all very simple stuff. In addition to this I have a dust proof folder to store negatives in, plus 3 more measuring jugs.
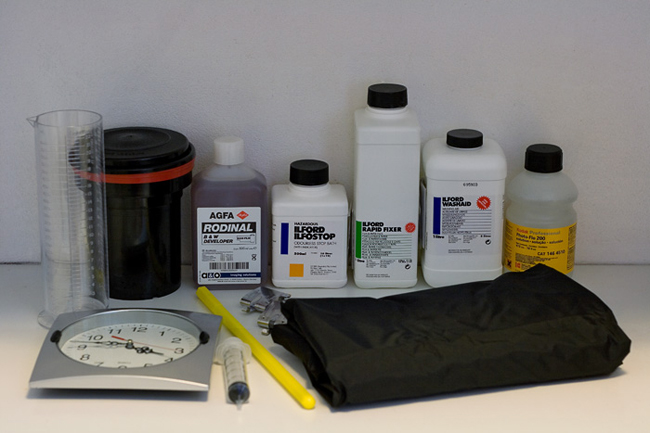
In the photo you can see the chemicals, the developing tank with 2 reels inside (back left), the changing bag (front right), thermometer (in yellow case middle centre), film clips, measuring syringe, cylinder measuring graduate, and a cheap $2 clock with seconds hand. The chemicals are relatively cheap, and everything else is reused, so after the initial purchase the only things you’re spending money on is the film. At the moment I’m using the Rodinal at 1:50 for 13 minutes for 100ISO film, so at 6ml per roll, the 500ml bottle will last ages.
It’s a really enjoyable and rewarding process so I suggest everyone should try it at least once. The only danger is you may get the urge to make your own wet prints. An equally enjoyable process but one requiring a slightly greater commitment of time and resources!

