
Tech/Repairs
-
Pinhole Body Cap
Well last year I saw some pictures a guy took with a home made pinhole adapter for his DSLR. The results were quite interesting, and thought it’d be fun to try out. All you really need is a body cap for your camera and a piece of aluminium foil. I didn’t have a spare one at the time so never bothered with it, but last year I bought one for about $1 when I was in Japan and thought it’d be good for this project. Last week I finally got around to making the pinhole body cap and had some fun testing it out.
Here are some pictures I took around my house the day I made the pinhole cap. It was raining outside so I couldn’t get any external shots which is what I originally wanted.
I didn’t apply any post processing to these shots, besides one that I stitched together. The results aren’t ground breaking but it was a fun experiment.


*This one was made from two photos stitched together.
It was all a bit of trial and error, and conditions weren’t ideal, but I think the feel of them are quite interesting, and I look forward to trying the pinhole adapter outside.
Below is a picture of my homemade pinhole body cap clearly crafted to the highest quality and standards….
All you do is drill a hole in the plastic body cap (can be any size you want really). Then you get some aluminium foil, put a tiny hole in it with a pin, and stick the aluminium foil to the body cap so the pinhole is as close to the middle as possible. Very simple.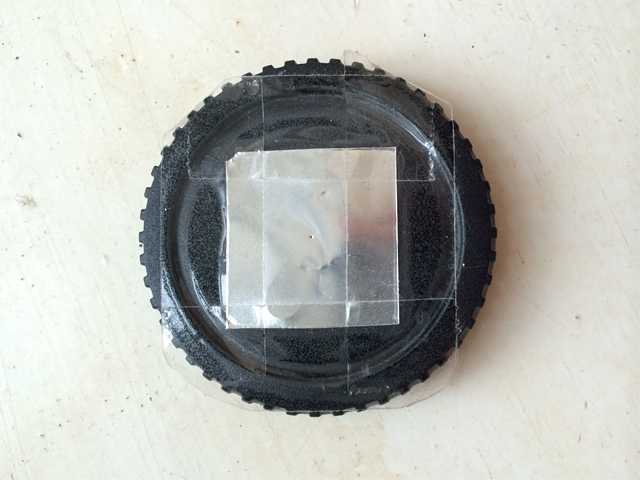
-
A nice surprise
Well I started off having a pretty bad morning today before I’d even left for work. But when i got there i had a nice surprise.
I looked on my desk and saw something that I definitely didn’t leave there the previous day. It was in the shape of a crusty old looking Olympus OM1. Awesome!
See the good thing about being known as a “camera/photo guy” among friends is that when one of them sees a camera they think of you.. And this is what happened in this instance. One of the people i work with was at a garage sale earlier on. Unfortunately it was full of the usual plastic toys and old babies clothes… All useless shit (I don’t know why you’d want to buy your newly born baby some old babies clothes that the previous occupant has probably crapped in a dozen times). Anyway, that’s a whole other story.
The guy from work was at this garage sale full of useless crap when he spotted the Olympus. It was covered in dust and grime but still thought of me (hmm, maybe that’s not a good thing?). The asking price was a huge $2, so he bought it for me. I was totally taken back by the gesture as nobody has ever actually bought me an old camera, especially a good one, and especially one that i can actually use with all my other lenses etc. Generally people try to stop me buying old camera stuff and steer me away from anything that I’ll probably end up buying. So yeah, I was extremely happy, and it made my day.
The camera itself is very rough. As in, its the poorest condition camera I’ve ever owned. But I know for a fact it’ll be working perfectly it next to no time. I started off by cleaning it tonight and it’s come up wonderful. The only negative side to cleaning up the camera body is that you suddenly see all the bumps in it that were previously covered up. It was clear from the beginning that this camera will never be a show piece, but I always wanted an OM1 to use, its close to the perfect SLR.
So anyway, after cleaning the body up I thought I should check out to see if the thing actually works. The viewfinder was perfectly clean which was a relief. Then i noticed the light meter needle which was moving as I changed apertures and shutter speeds. Woohoo! That seems to be working, just not sure how accurate it is, but definitely a positive. Quickly fixed the film rewind lever that was assembled wrong (someone must of taken it apart in the past and put it back together wrong.
Next was to see if the shutter actually fired. This is where things get a little less perfect. Well, the shutter itself fires beautifully and at all different speeds. But to get the shutter to fire I need to advance the film lever which is a little strange. For some reason it wont wind fully the first go, so I’ll have to give it 1 wind and a bit for the shutter to be able to fire. Obviously it just needs an adjustment, and it actually still works fine in the end. This thing will be working perfectly soon, but i might start using it before then anyway 🙂Below is a quick picture of the beast before the clean (It actually looks a lot cleaner in the photo than in real life). I’m too tired to post up the cleaned version, so i’ll do that another time. But as you can see, the camera was pretty crappy. Oh it also came with the 50mm f/1.8 lens too which didn’t work until i took it apart also 🙂 Was definitely a learning experience as I’d never taken a lens apart and had no instructions. I managed to get all the dust out of it and clean the aperture “thingy” (technical word). It all seems to work perfectly, but will probably seize up soon, as I didn’t lubricate any of the parts when i put it back together.
So yeah, here it is so far. I’m looking forward to eventually taking some pictures with it and posting them up here.
-
Ghetto style light box
Well I’ve been meaning to make one for a while now, and this afternoon I finally did it.
All you need is:
– Cardboard box,
– White paper, tracing paper or white plastic,
– Tape,
– Lights (desk lamps or anything directional).Method:
Simply cut out the sides of your cardboard box. Obviously don’t cut everything, you need to keep the cardboard box as a frame so it’s keeps its structural integrity. Next you just tape the paper to the sides of the remaining cardboard box “frame” making sure to leave one side completely open. By now you should have a box frame with paper attached to all but one side. If so, you’re finished!Well almost. All that’s left is setting up your light sources to point through the paper sides of the box shining in to the object you’ll place inside. The idea is that the paper diffuses the multiple light sources entering the light box creating a soft even light with minimal shadows. It’s best to have the same type of lights on the outside if possible as it helps keep an even white-balance. As you can see my white balances are off as I ended up using 4 completely different light sources, which wasn’t ideal.
I think I got an ok result for a first time test. I need to work on focusing and composition, as well as exposure and controlling the harshness of the lights a bit more.. So basically everything..
I’m looking forward to giving it another go though when I can spend more than 10 minutes setting it all up.
Here are a few of my results so far (yes, the white balance is all over the place).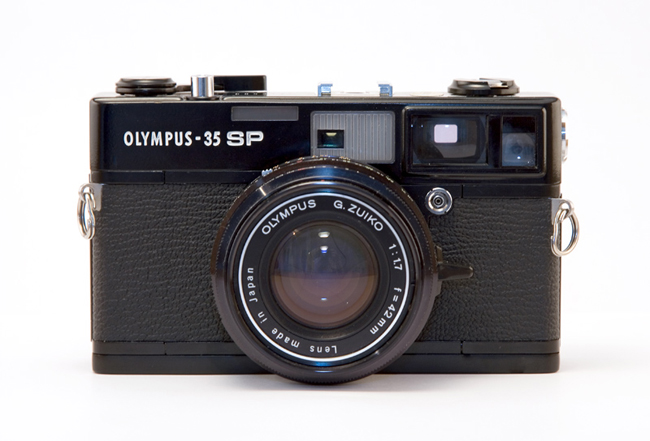

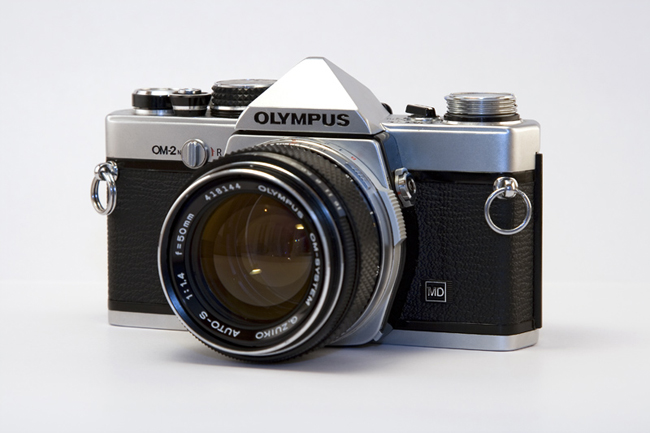
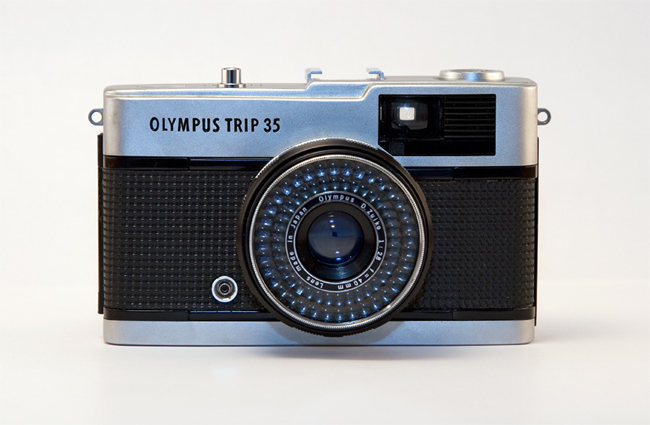
😀

-
Olympus Trip 35 Age Explanation
The humble little Olympus Trip 35 was built between 1968 and 1984. That’s an impressive life span for a camera that remained mainly unchanged during its lifespan.
Want to find out how old yours is? The best way to discover the age of your Olympus Trip 35 isn’t by looking at its top plate serial number as some people mention from time to time, but by looking under the film pressure plate. It’s a very simple process and will only take a few minutes.
First of all you need to remove the pressure plate attached to the film door. It’s the black rectangle object in the centre of the film door you can see in the picture below.
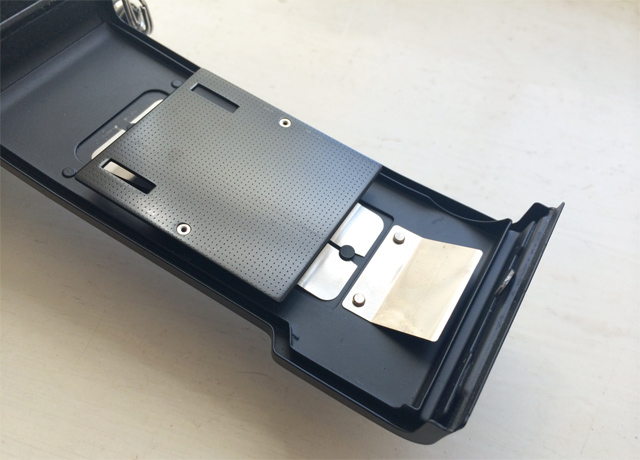
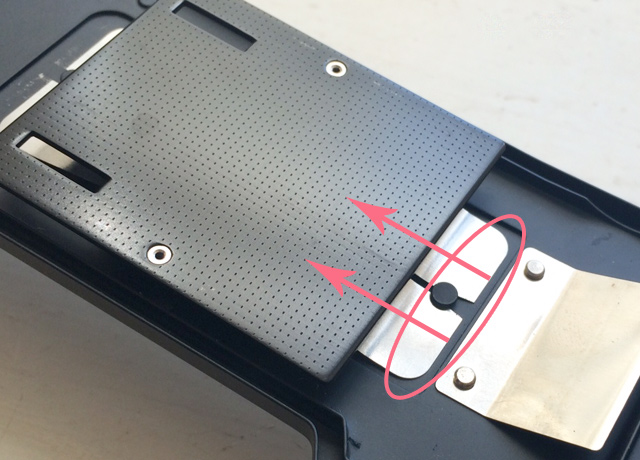
To take it off you need to slide the metal tabs off the black pins attached to the film door. Do this one side at a time by pushing the metal tab inwards using either your fingers or a flat edged screwdriver. Once you release one side, sliding out the other side is easy and now you can fully remove the pressure plate.
Now that the the plate off you can easily view the characters printed underneath, these will accurately tell you the age of your camera. The photo below shows that date stamping of one of my cameras that we’ll be using as an example :
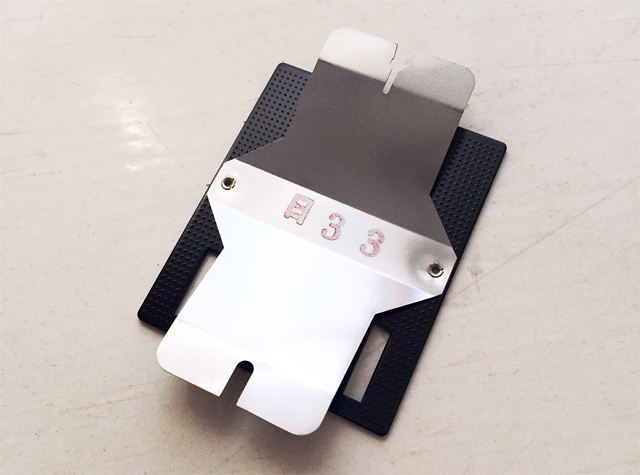
As you can see, there are 3 characters. A Japanese character and two numbers.
This is how to read it :- 1st character – The plant it was manufactured in,
- 2nd character – The last digit of the year of assembly. (so “3” = 1973, “9” = 1979, “0” = 1980, etc..),
- 3rd character – The month of assembly. (1 – 9 signifies January – September. Then X,Y,Z is for October – December).
Now the observant among you would of noticed that if you had “82” on the pressure plate it could either be February 1968 or February 1978. The way to find out what decade it belongs to is by looking at the shutter button. If it’s the chrome variety you have the earlier model, if it’s the black plastic variety you know you have the later model. I have included a photo below showing the two different types of shutter buttons. The chrome/older variety on the left, with the newer plastic shutter button on the right.
Other age identification details:
- The first black plastic shutter button models started in the second quarter of 1978.
- Earlier models had ASA 25 – 250, the latter 25 – 400.
- In 1969 and 1970 Olympus also produced a number of black bodies with black metal shutter buttons. *These demand a higher price but beware of fakes. One way of checking could be cross referencing the manufacturer year and if it doesn’t wall within ’60 or ’70 you may have a fake. This won’t work of course if they repainted a model from either of these two year but it’s a good start.
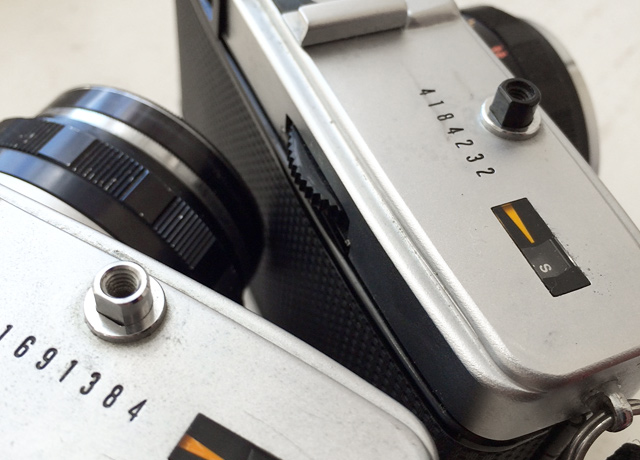
So based on all of this information I can conclude my camera above was built in March 1973. My other trip’s were built in ’69 ’74 and ’76. If you can find one from the 60’s it’s probably worth hanging onto as they’re a little more scarce. Wait a minute, who am i kidding? ALL Olympus Trips are worth hanging onto!!
*New addition! I’m the happy owner of this lovely original Olympus Trip in black paint. I think this is one of the best looking cameras Olympus ever made.

Feel free to share the age of your Olympus trip in the comments section below.
-
My Holga GCFN : or how I stopped worrying and learned to love the light leaks
Seen Dr Strangelove?… Maybe not..
Anyway… I was given a Holga 120 GCFN for Christmas and thought that its about time I tried to shoot a few things with it.
Yes, I accept the fact that Holgas have pretty much been done to death and they’re looked down upon by many. But I take photos for fun, and a Holga is a toy camera, so it seems pretty natural to give one a go at some point. I’ve seen some amazing photos produced by Holgas, so I’m looking forward to running a few rolls of film through mine.
Now, if you know anything about Holgas, you’ll know they don’t have the best build quality. That’s no big deal if you know this and accept it. But if you’re expecting a Holga to produce the same image quality as other medium format cameras on the market, you’ll be disappointed. What Holga’s do have though is an unpredictability factor. A “feature” that can give some amazing results. Lens flares, Light leaks, vignetting, double exposures, over/under exposures, soft focusing, all the norm with Holga’s.
“Err that sounds shit. Why would you want that? Just by some good L glass(Canon) and take photos of sunsets and macro insects with the rest of us”
As much as I like macro photos of fly heads, and sunset pictures of the Sydney harbour bridge, I want to try out being a Holga snob for a little bit.Ok, now as much as all of those unique Holga “features” are good and everything, I want to get rid of some of them. The first thing I’ll be doing is some some flocking on my holga.
Holga Flocking :
Ok, the awesome cheap ass plastic that Holga uses is shiny as hell. This is pretty bad for the insides of a camera. You don’t want light flying around inside your camera as it can impact on the image “quality” from the Holga. By flocking your camera you can stop all this from happening and should increase the contrast of your photos.
How do I flock? Well, its pretty easy, and only takes a matter of minutes.1. Get some matt black spray paint. Hardware stores and hobby shops are good for this, just make sure its matt not gloss, the whole idea is to stop light reflections.
2. Mask up your Holga. Cover the the shutter assembly, battery terminals, foam, etc with some sort of masking tape. The idea is to spray all the shiny plastic surfaces that aren’t really do anything. Also make sure you mask the red window on the film door so it doesn’t get sprayed.
3. Lay out newspaper in a well ventilated room. Optional.
4. Start spraying the plastic parts in long even strokes. Several light coats are better than one heavy coat. Make sure you spray into all the smaller tricky areas.
5. Allow to dry before assembling. It’ll be stupid if you start grabbing pieces that are still wet, unless you’re going for the rough fingerprint finish.
Your done! Your Holga is now Flocked. The masking takes about 10 times as long as the actual spraying. Just don’t rush anything, because if you do and make a mistake it’ll turn a 15 minutes job into a 1 hour job.
Below is a photo to illustrate the differences between the normal plastic and the flocked plastic. As you can see the difference is pretty noticeable.
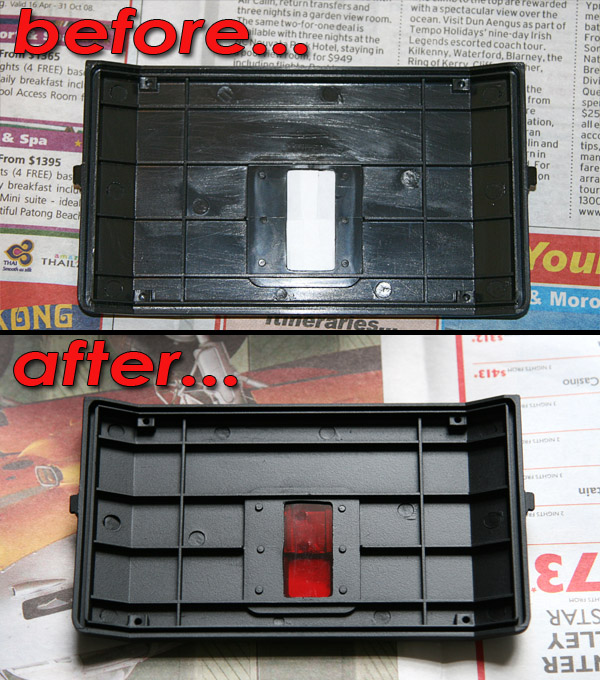 Check out my sweet Typography…
And the whole lot:
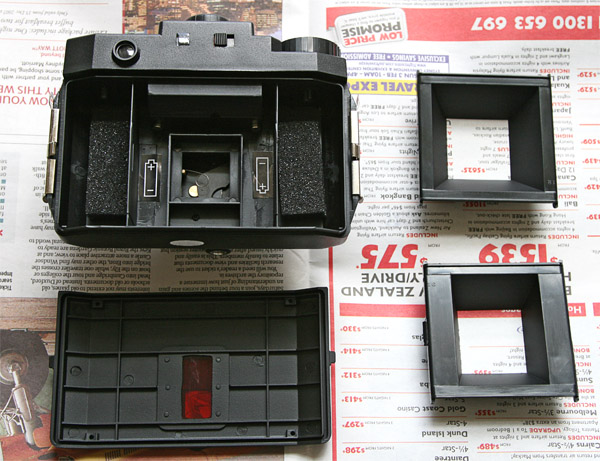 Â Average photos, but you get the idea.
 Average photos, but you get the idea.It took about 15 minutes in total.
Now all that’s left is to take some photos. Oh, and to find a place that develops 120 film. I had a recent disaster with the place I’ve been using near my house, so I wont be going back there. Details to follow next time.